Posts

Showing posts from June, 2018

Create and Distribute Survey in Dynamics CRM - Part II

Image
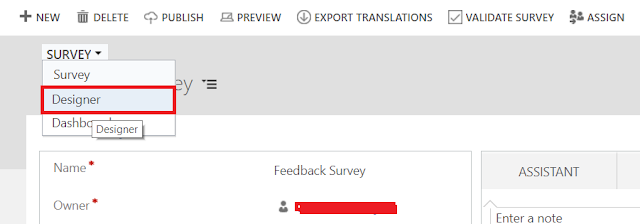
In the  Previous Blog  we have seen the survey creation and its component. In this blog we will walk through to design the survey. Survey Designer handles the survey page representation, you can a series of question and choose the response type you want to suggest to the user. Steps to create Survey in Designer: Click on Top right hand side Survey drop down and select Designer.       2. Survey Contains three section, Welcome Page , Question/Answer designer , Complete Page .            You can edit each component by clicking Edit button.     3. You can drag your Question/Answer elements from right side of the page and drop it on the part          [Drag a question here].     4. After creating all pages Click on Validate Survey ,   It will take some time to get Survey                      validate, check the result in Survey Validation Result.     5. Once the survey has been successfully validated , click on Publish button to publish the survey.    

Create and Distribute Survey in Dynamics CRM - Part I

Image
One of the most interesting feature of Dynamics CRM 2016 was Voice of  the Customer Survey . Now you can send survey link to your customer asking about the feedback regarding product and services. The survey can be taken on all platform that CRM supports. Voice of customer gives you the viability to distribute the survey and store the response in dynamics crm. Voice of Customer is available as an add-on in Dynamics CRM. After creating your Dynamics CRM instance go to  portal.office.com  and click on Admin. Click to manage Dynamics CRM and in APPLICATIONS tab you will get Voice of Customer add-on. Select Voice of Customer and click on Manage, you have to select the instance for which you want to configure Survey functionality. Once the VOC steup completed refresh your CRM instance and Voice of Customer will be available in navigation pane. Steps to create Survey - Create Theme for your Survey: Themes gives you capability to change the color of  Survey components such as

Tips and Tricks for data import into SQL Server – Part II

Image
In this post we will import data from .xlsx file into SQL Server. As with  Tips and Tricks for data import into SQL Server – Part I   , you might think this is a trivial task. You are correct ! However, in this post we will pick a case where we do have to take configuration steps w.r.t. the task at hand before we can actually import data. Our challenge is that we have and 32-bit Microsoft Office 2016 installed on our 64-bit SQL Server and we want to import data from .xlsx file. Let's start by solving one problem at a time as we start to import data from .xlsx file. Below is our .xlsx file placed at a local folder. Step 1: We will try to import using OPENROWSET query SELECT * FROM OPENROWSET ( 'Microsoft.ACE.OLEDB.12.0' , 'Excel 12.0;    Database=C:\Users\.....\SourceFile.xlsx' , 'select * from [Sheet1$]' ) As expected, we will encounter an error. Step 2: We take a clue from the error itself. To resolve we need to enable 'A

Tips and Tricks for data import into SQL Server – Part I

Image
In this post, we will import a .csv into SQL server. While importing csv can be one of the easiest task that can come over to you as a part of your daily duties of  being a data engineer, sometimes it can require a bit more thinking and efforts. A similar thing came across, where around 50+ large .csv files in a shared location and had to be imported in SQL server and all of them had varying headers which meant destination tables were supposed to have different schemas. Though, there are numerous methods to achieve this for example you create an SSIS package or may be write a PowerShell script to loop through the files, and import them. However, we looked to use SQL Server’s bulk insert command to complete the task. If you have worked with BULK INSERT, you would have noticed that the destination table must be present beforehand. Therefore, the main challenge is that, destination tables with different schemas have to be created dynamically (on the fly) according to the .c

Import Data from Sales Force to SQL Server: Part I (Using Alteryx)

Image
Introduction In this post, we will look to perform a task, which is a very common requirement in field of data viz. importing data from Sales Force (a.k.a. SFDC).  We will import data from a sales force table to SQL Server using Alteryx. We need to have access to SFDC.  Step 1:  Open Alteryx and go to Connectors tab on the tools ribbon. Step 2:   Choose SalesForce Input. Drag it on to the canvas. Step 3:  Once you drag the Salesforce input to the canvas, you need to provide following credentials 1)   URL (salesforce URL where the objects are present for data pull) 2)  User Name ( This is your user name using which you access SFDC) 3)  Password ( Your SFDC login’s password) 4)  Security Token Step 4:  Once you provide your credential and connect. Next step is to choose the table.   You can use either the query builder or the custom query option to select the data, which you wish to pull.  Using Query Builder 1)  Select Table from the drop do

Add Auto Number attribute using XrmToolBox

Image
With Dynamics 365 release 9.0 we got an interesting feature to add Auto-Number attribute to an entity. Currently CRM has provided a way to add the attribute programmatically. I was searching for a way to achieve this in which I don’t need to write any code. Luckily I have found that XrmToolBox is giving the effortless way to create auto-number attribute for the entity. Let’s go step by step and add an auto-number attribute to opportunity entity. Step 1:   Download XrmToolBox v1.2017.7.18 or higher version. Step 2: Extract the downloaded solution and open the application. Step3: Go to Plugin Store-> select Auto Number Manager and click to install. As soon the plugin will get install it will be available for you to use in Toolbox. Step 4: Connect to your Organization and now open Auto Number Manager from the tool list. Step 5: Select earlier created solution and choose the entity in which you want to add attribute. In my case I have taken opportunity en

Hide OOB Ribbon Button

Image
Let’s go step by step and learn how to hide OOB ribbon button. Step 1: Install Ribbon Workbench if you don’t have ribbon workbench installed. Please go to the following link  Download Ribbon Workbench click on download button and give your mail id to get the Ribbon workbench solution. Step 2: Go to Setting and Click on Import button to Import the downloaded RibbonWorkbench_Managed Solution to your CRM Instance. As soon as the solution will get imported to the instance you can find Ribbon Workbench you will find the tool installed on the top of solution page. Step 3: Create a solution and include the entity you want to do the customization. In my case I have taken Opportunity. Step 4: Open Ribbon Workbench and select the solution you created. Step 5 : On the left hand side select RIBBON , by default COMMAND BAR has been selected. Step 6 : Click on the button you want to hide and select Customize Command option, here I have selec