Import Data from Sales Force to SQL Server: Part I (Using Alteryx)
Introduction
In this post, we will look to perform a task, which is a very common
requirement in field of data viz. importing data from Sales Force (a.k.a.
SFDC).
We will import data from a sales force table to SQL Server using Alteryx.
We need to have access to SFDC.
Step 1: Open Alteryx and go to
Connectors tab on the tools ribbon.
Step 2: Choose SalesForce
Input. Drag it on to the canvas.

Step 3: Once you drag the
Salesforce input to the canvas, you need to provide following credentials
1) URL (salesforce
URL where the objects are present for data pull)
2) User Name ( This
is your user name using which you access SFDC)
3) Password ( Your
SFDC login’s password)
4) Security Token

Step 4: Once you provide your
credential and connect. Next step is to choose the table. You can use either the query builder or the
custom query option to select the data, which you wish to pull.
Using Query Builder
1) Select Table from the drop
down. (Note that the tables accessible depends on your login’s level of access)
2) Select the fields (output fields
will show how many field’s you have selected to pull)
3) We can limit the number of
records we want to pull using Record Limit (e.g. let us say we wish to pull only
100 records, then give 100 as the record limit)
4) WHERE clause section gives the
option to provide a filter condition to be applied. (Note it has to be in SOQL)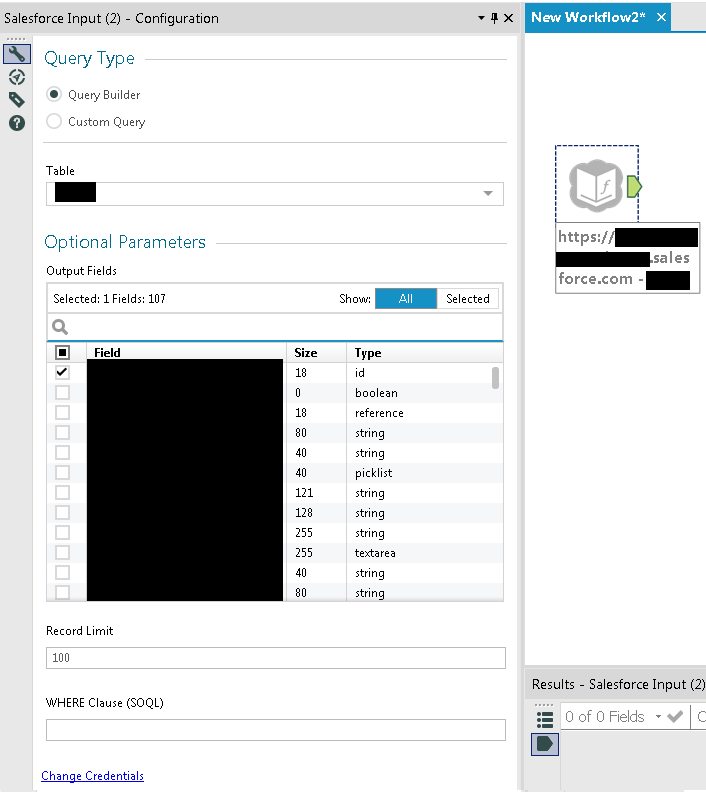
Using Custom Query
1) Here, we have the flexibility to write Custom
SOQL query to pull data. (Note, we can join tables, apply filter etc. using
this option)
2) The query can be validated.
 Step 5: Now, we are ready with our SalesForce
input configuration.
Step 5: Now, we are ready with our SalesForce
input configuration.
Step 6: Lets, drag the output data tool from the
in/out tools, on to the canvas.

Configure the SQL server connection
1) Provide a name for the SQL
connection.
2) Provide the server you want to
connect.
3) Give the authentication details (
windows authentication/SQL authentication )
4) Test the connection. If success,
a connection is established.
5) Once the connection is
established, you can choose the destination database (from the drop down
menu) where you want to import the data.
6) Click on OK.
7) A new pop up appears
prompting to provide the table name. Provide the destination table name and
click OK.
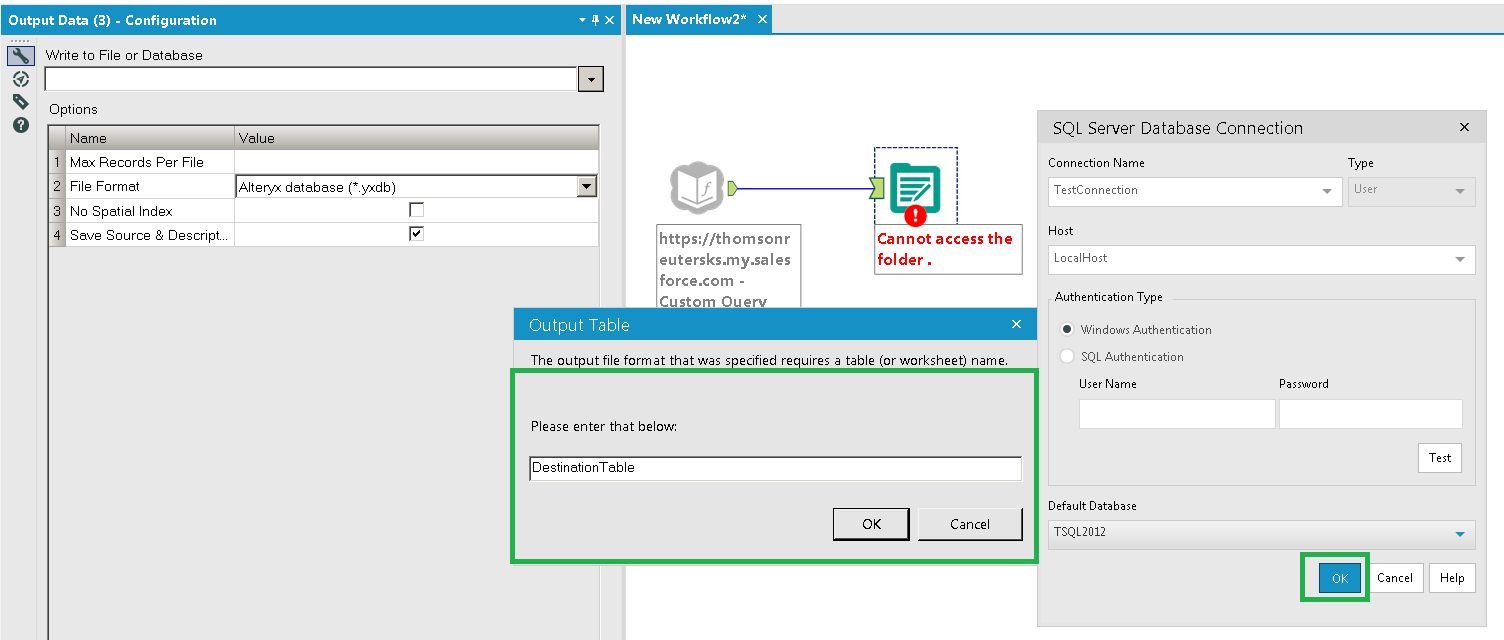
Step 7: We can also configure
various options of the output tool as per our requirement.
 Step 8: Once the configurations
are completed. Run the workflow.
Step 8: Once the configurations
are completed. Run the workflow.
 Step 9: Success message pop-up
appears once data is import is completed.
Step 9: Success message pop-up
appears once data is import is completed.

 That’s it !!
We successfully imported data from Salesforce to SQL server destination.
In this post, we will look to perform a task, which is a very common requirement in field of data viz. importing data from Sales Force (a.k.a. SFDC).
We will import data from a sales force table to SQL Server using Alteryx.
We need to have access to SFDC.
Step 1: Open Alteryx and go to Connectors tab on the tools ribbon.
Step 3: Once you drag the Salesforce input to the canvas, you need to provide following credentials
1) URL (salesforce URL where the objects are present for data pull)
2) User Name ( This is your user name using which you access SFDC)
3) Password ( Your SFDC login’s password)
4) Security Token
Using Query Builder
1) Select Table from the drop down. (Note that the tables accessible depends on your login’s level of access)
2) Select the fields (output fields will show how many field’s you have selected to pull)
3) We can limit the number of records we want to pull using Record Limit (e.g. let us say we wish to pull only 100 records, then give 100 as the record limit)
4) WHERE clause section gives the option to provide a filter condition to be applied. (Note it has to be in SOQL)
Using Custom Query
2) The query can be validated.
Step 6: Lets, drag the output data tool from the in/out tools, on to the canvas.
Configure the SQL server connection
1) Provide a name for the SQL connection.
2) Provide the server you want to connect.
3) Give the authentication details ( windows authentication/SQL authentication )
4) Test the connection. If success, a connection is established.
5) Once the connection is established, you can choose the destination database (from the drop down menu) where you want to import the data.
6) Click on OK.
7) A new pop up appears prompting to provide the table name. Provide the destination table name and click OK.
We successfully imported data from Salesforce to SQL server destination.


Comments
Post a Comment