Steps for how to create CLR Stored Procedure in SQL Server
Steps for how to create CLR Stored Procedure – SQL Server
What is CLR?
The .NET Framework provides a run-time environment called
the common language run time (CLR). CLR manages the execution of programs
written in different supported languages.
CLR transforms source code into a form of byte code known as
Common Intermediate Language (CIL). At run time, CLR handles the execution of
the CIL code.
For further reading on CLR, please go through the article
provided in below link:
CLR Role in SQL
Server Stored Procedure:
CLR plays the role of
interoperability to make C# code being worked as SQL Stored procedure.
To make the C# code to be
understandable or converted to SQL Stored procedure, CLR comes into picture.
The reason to create
Stored Procedure or Functions in CLR is to accomplish many tasks which is not
possible in T-SQL like complex String Operations etc. So, without further due
let’s get started.
In this example, we will be printing the Current System Date
in the CLR Stored procedure.
Step 1: Enable
CLR by executing the below scripts in SQL Server:
Step 2: Create
a SQL Server Database Project with the same name as Database Name under which
you want to create CLR Stored Procedure. Please find below snippet for your
reference:
Highlighted Name is same as Database Name already present in
SQL Server.
Step 3: Once the project is created. Import the mentioned
database in this project by clicking on database option in below snippet:
Next Step is to provide the Database details for which you
want to do the import.
After clicking on ‘Select Connection’, you will see the
below pop up where you should select the Database:
Once you provided the details for Server and Database, click
‘Connect’ à
then click ‘Start’ button from previous snippet. This will start importing the
Database to your project.
Step 4: Now you imported the Database to your project, it’s
time to add a C# Stored Procedure definition. Follow below steps to add CLR C# Stored
Procedure.
You need to select SQL CLR C# Stored Procedure and provide
some meaningful name.
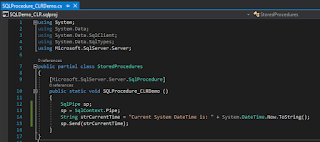
Once the file is added for SQL CLR C# Stored Procedure.
Please update the code as mentioned below and save the file:
Step 5: Now right click the solution and click ‘Build
Solution’ option to build the created solution.
Once the build is succeeded, ‘.dll’ file will be created
under your project folder on your disk as shown in below snippet.
Step 6: Now after .dll file is generated, there are two
options to deploy the CLR Stored Procedure in SQL Server. Let’s talk about Case
1 first.
CASE 1: Publish the database.
We need to publish the project to the respective database.
Once you click the above option, below pop up will ask you to provide
the database connection to publish the Project.
After you provided the required information, click on
publish and you should see the below output.
This is the CASE 1 to deploy the CLR Stored Procedure in SQL
Server. Now if you will check in your SQL Server database, CLR Stored Procedure
should be visible.
CASE 2: Manual Process
Create an Assembly - Use the generated .dll file for creating
assembly.
Execute the below script by providing the values in place holders in
SQL Server to create Assembly corresponding to .dll file:
CREATE ASSEMBLY [SQLDemo_CLR]
FROM '<<path of the
.dll file generated to be provided by us>>'
WITH PERMISSION_SET = SAFE
GO
Create a SQL Server CLR Stored Procedure from the Assembly
by executing below query:
CREATE PROCEDURE <<Procedure Name to be provided by you>>
AS
EXTERNAL NAME SQLDemo_CLR.StoredProcedures.SQLProcedure_CLRDemo
GO
This is CASE 2 to manually deploy CLR Stored Procedure in
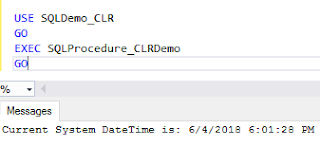
SQL Server. And when you will execute the created procedure in either of the
CASE, you should see the below result.
NOTE:
1. Stored Procedure Name will always be same as
Function name in CLR C# code for Stored Procedure in CASE 1 of the deployment.
But you can have different Stored Procedure name in CASE 2 of the deployment.


Comments
Post a Comment